Connect your calendar to fonea (Cal.com + Google or Outlook)
Last updated 3 July 2026
Your fonea assistant can book appointments right in the phone call — into your real calendar. To make that work, you connect your calendar once through a service called Cal.com. Think of Cal.com as a bridge: fonea talks to Cal.com, and Cal.com writes the appointments into your Google or Outlook calendar.
This guide walks you through the whole process picture by picture. You don't need any technical knowledge — simply follow the steps in order. You can pause at any time and continue later.
In short: You create a free Cal.com account, connect your calendar there, set up your appointment types, generate an API key (a secret password that lets fonea access Cal.com) and enter that key in fonea. Then you choose which appointment type your assistant may offer. Once set up, everything runs automatically. Cal.com is the bridge: fonea talks to Cal.com, and Cal.com connects to your Google or Outlook calendar — fonea never accesses it directly.
What you need
- An email address (ideally your business one).
- A Google calendar (Gmail / Google Workspace) or an Outlook calendar (Microsoft 365).
- Access to your fonea dashboard.
Allow about 15 minutes. You only do this once.
How the pieces work together (explained simply)
Before we start, here's the big picture — so you understand what happens behind the scenes. Three building blocks work together, each with a clear job:
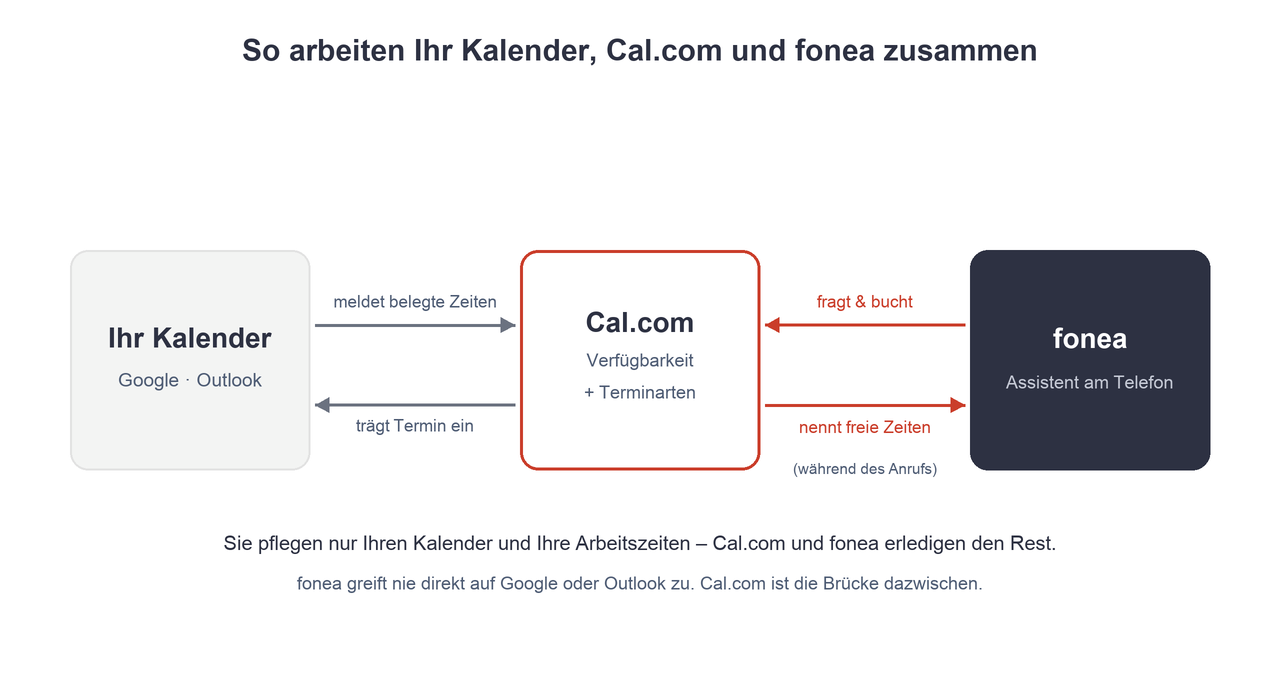
- Your Google or Outlook calendar remains your main calendar. It continuously tells Cal.com when you're already busy — so nothing ever gets double-booked.
- Cal.com is the appointment hub. Here you define two things: *when* you can be booked at all (your availability, e.g. Mon–Fri 9am–5pm) and *which* appointments exist (your appointment types, e.g. 30 or 60 minutes). Cal.com combines your working hours with the busy times from your calendar and therefore always knows which slots are genuinely free.
- fonea asks Cal.com for free slots during the call, suggests them to the caller and books the agreed appointment. Cal.com then automatically writes it into your Google or Outlook calendar.
In one sentence: You only maintain your usual calendar and your working hours — finding free slots, suggesting an appointment and entering it are handled by Cal.com and fonea. That's exactly why this setup is the simplest: no new calendar software, nothing maintained twice, no risk of double bookings.
Three terms, briefly explained
- API key: a long, secret password that allows fonea to book appointments in Cal.com. Keep it secret — like a password.
- Appointment type (called "Event type" in Cal.com): a template for one kind of appointment — e.g. "30 minutes" or "Initial consultation".
- Availability: your general working hours during which bookings can be made at all.
- Data region: where your data is stored. For Switzerland/Europe, choose European Union.
Part A: Create a Cal.com account
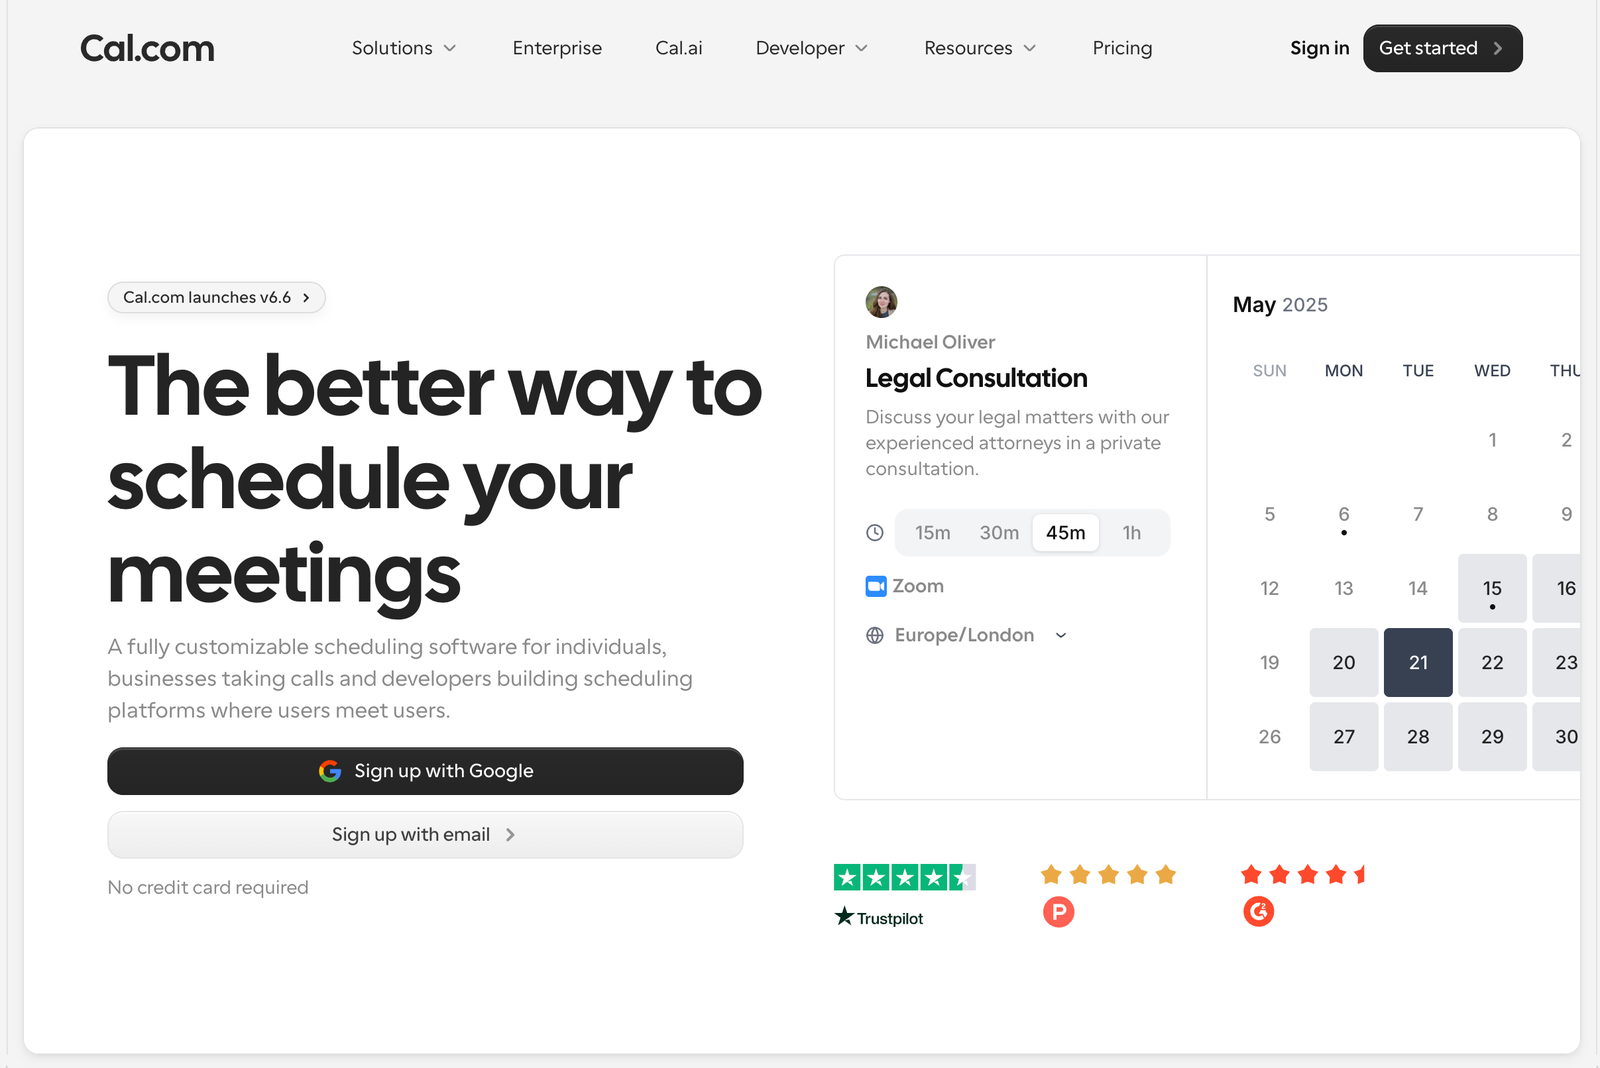
Step 1: Open Cal.com
Open cal.com in your browser and click Get started at the top right. You can then register with Google or with an email address.
Step 2: Register — and choose the right region
Now you create your account. Important: Set the Data region field to European Union. It defaults to "United States". With "European Union", your appointment and calendar data is processed in Europe — the privacy-friendly choice for Swiss businesses.
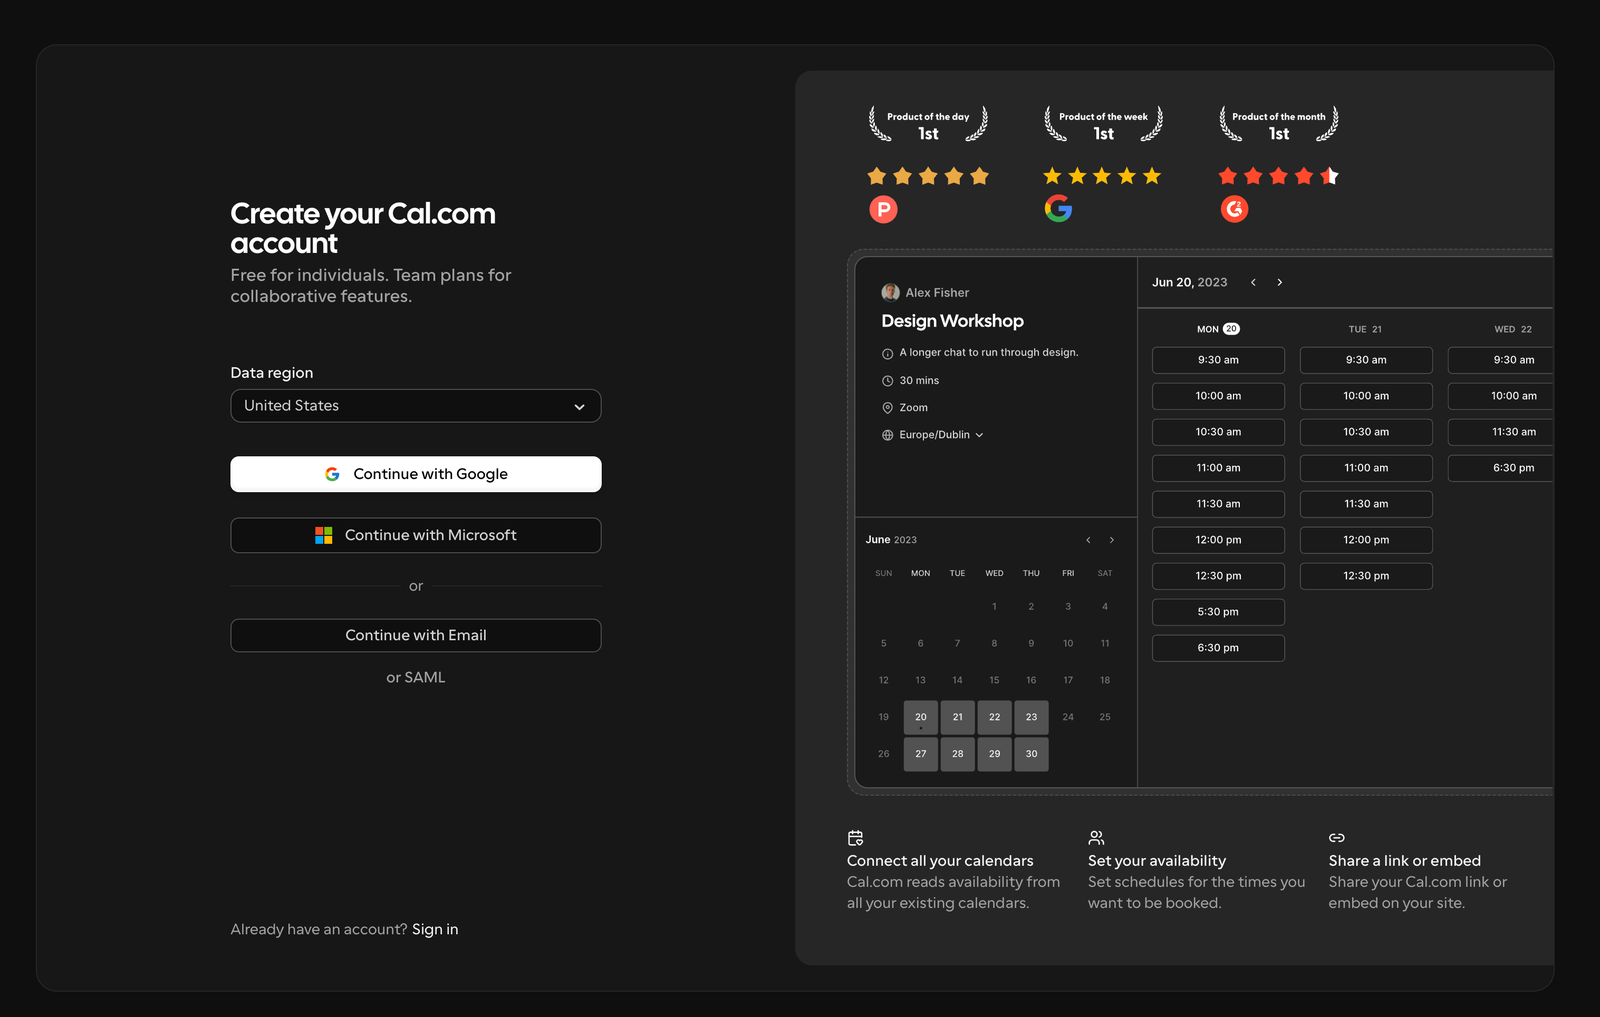
Then enter a username, email and password (or click "Continue with Google").
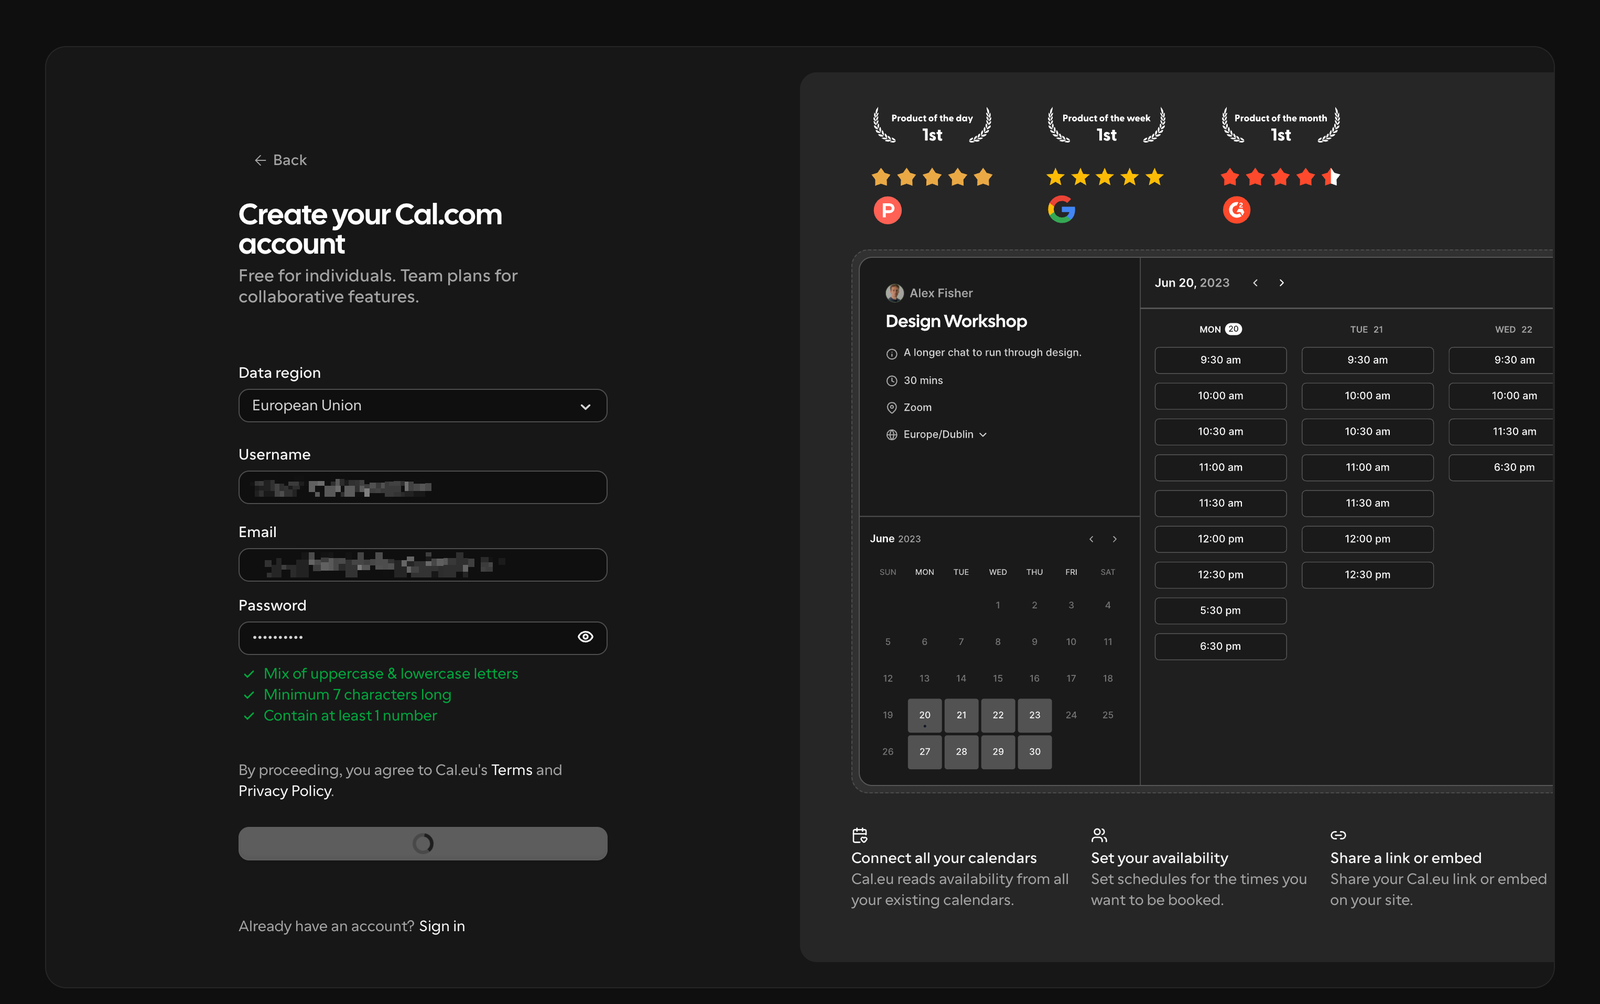
Good to know (this can be confusing): As soon as you choose "European Union", your account runs on the address cal.eu instead of cal.com. It's the same product, just hosted in Europe. So don't be surprised if "Cal.eu" appears at the top from now on — everything is correct.
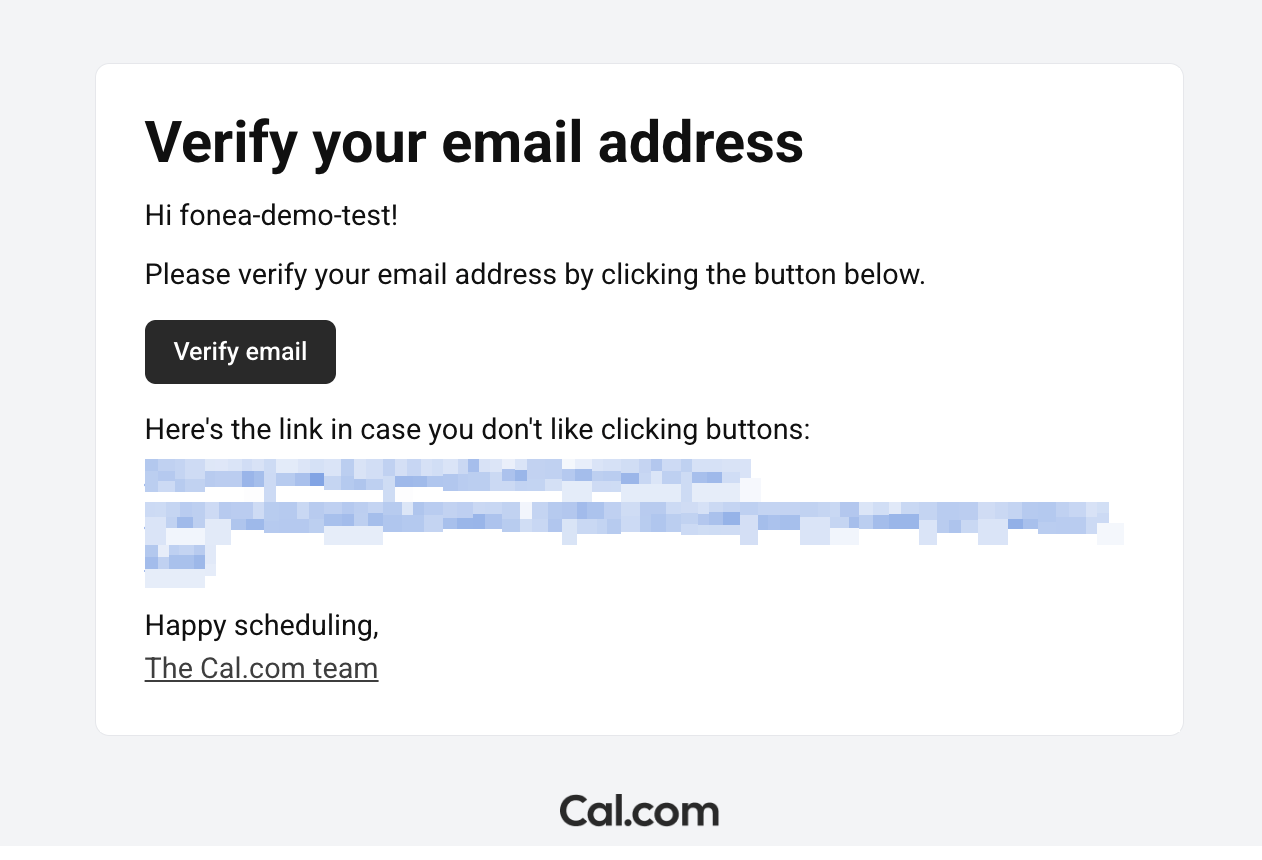
Step 3: Verify your email
Cal.com sends you an email. Open your inbox (via the button for your provider, e.g. Gmail or Outlook).
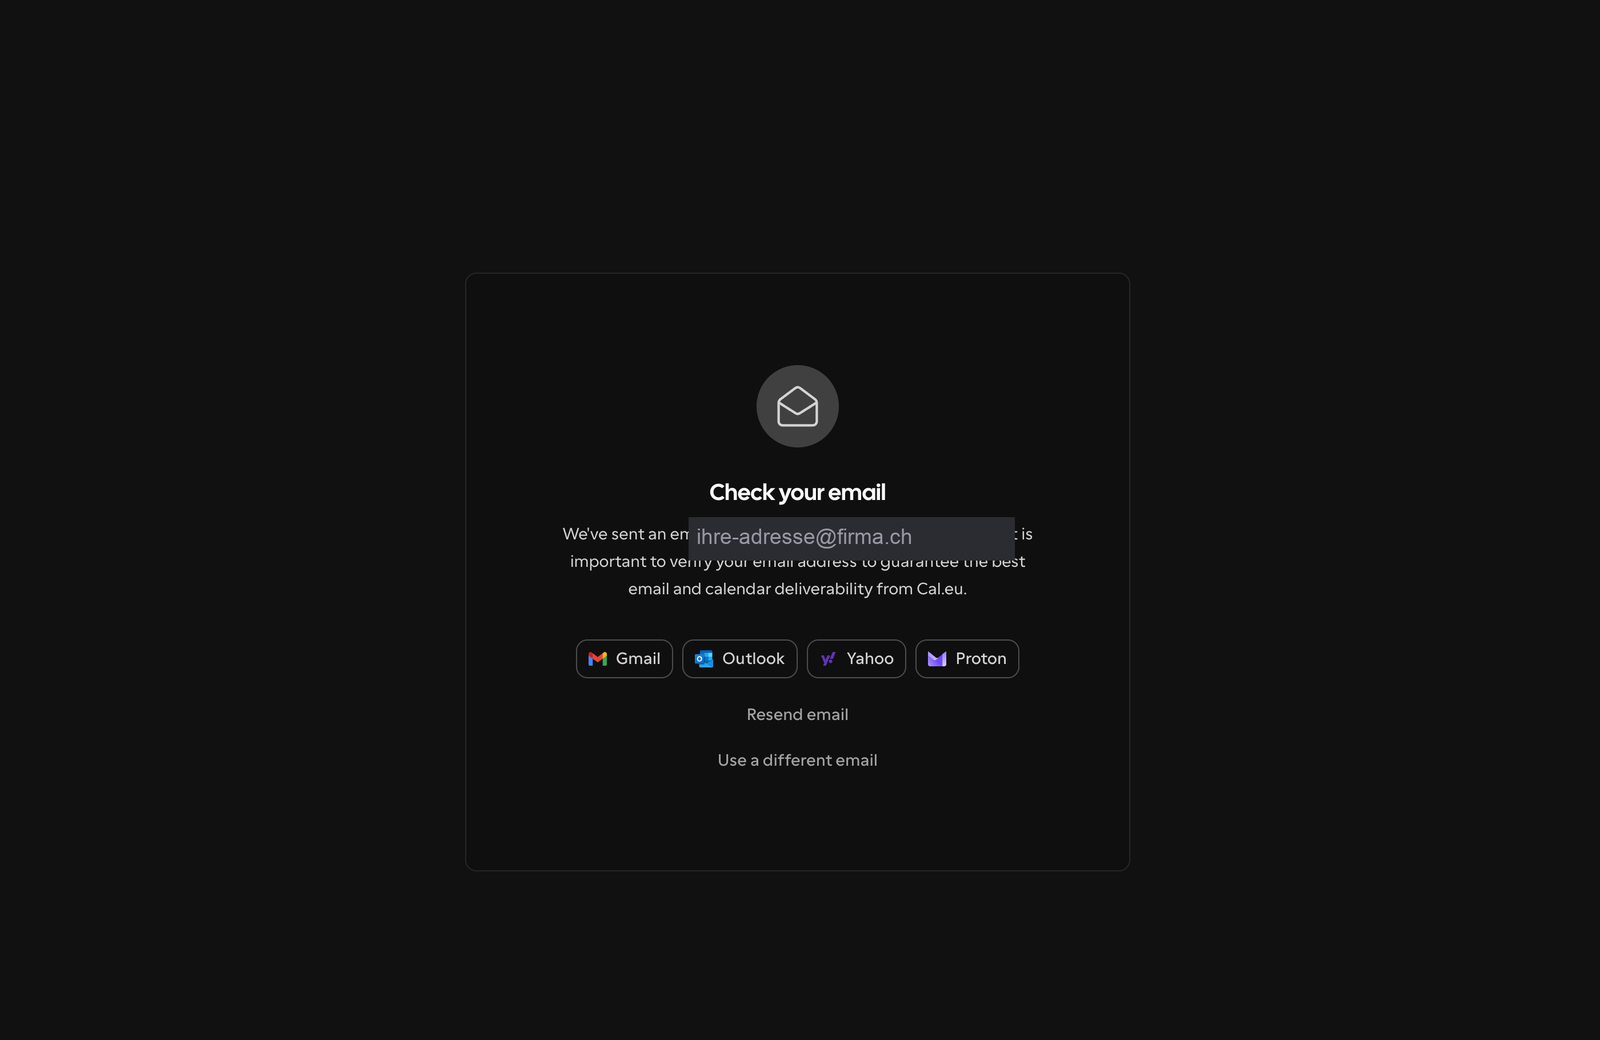
In the email, click Verify email.
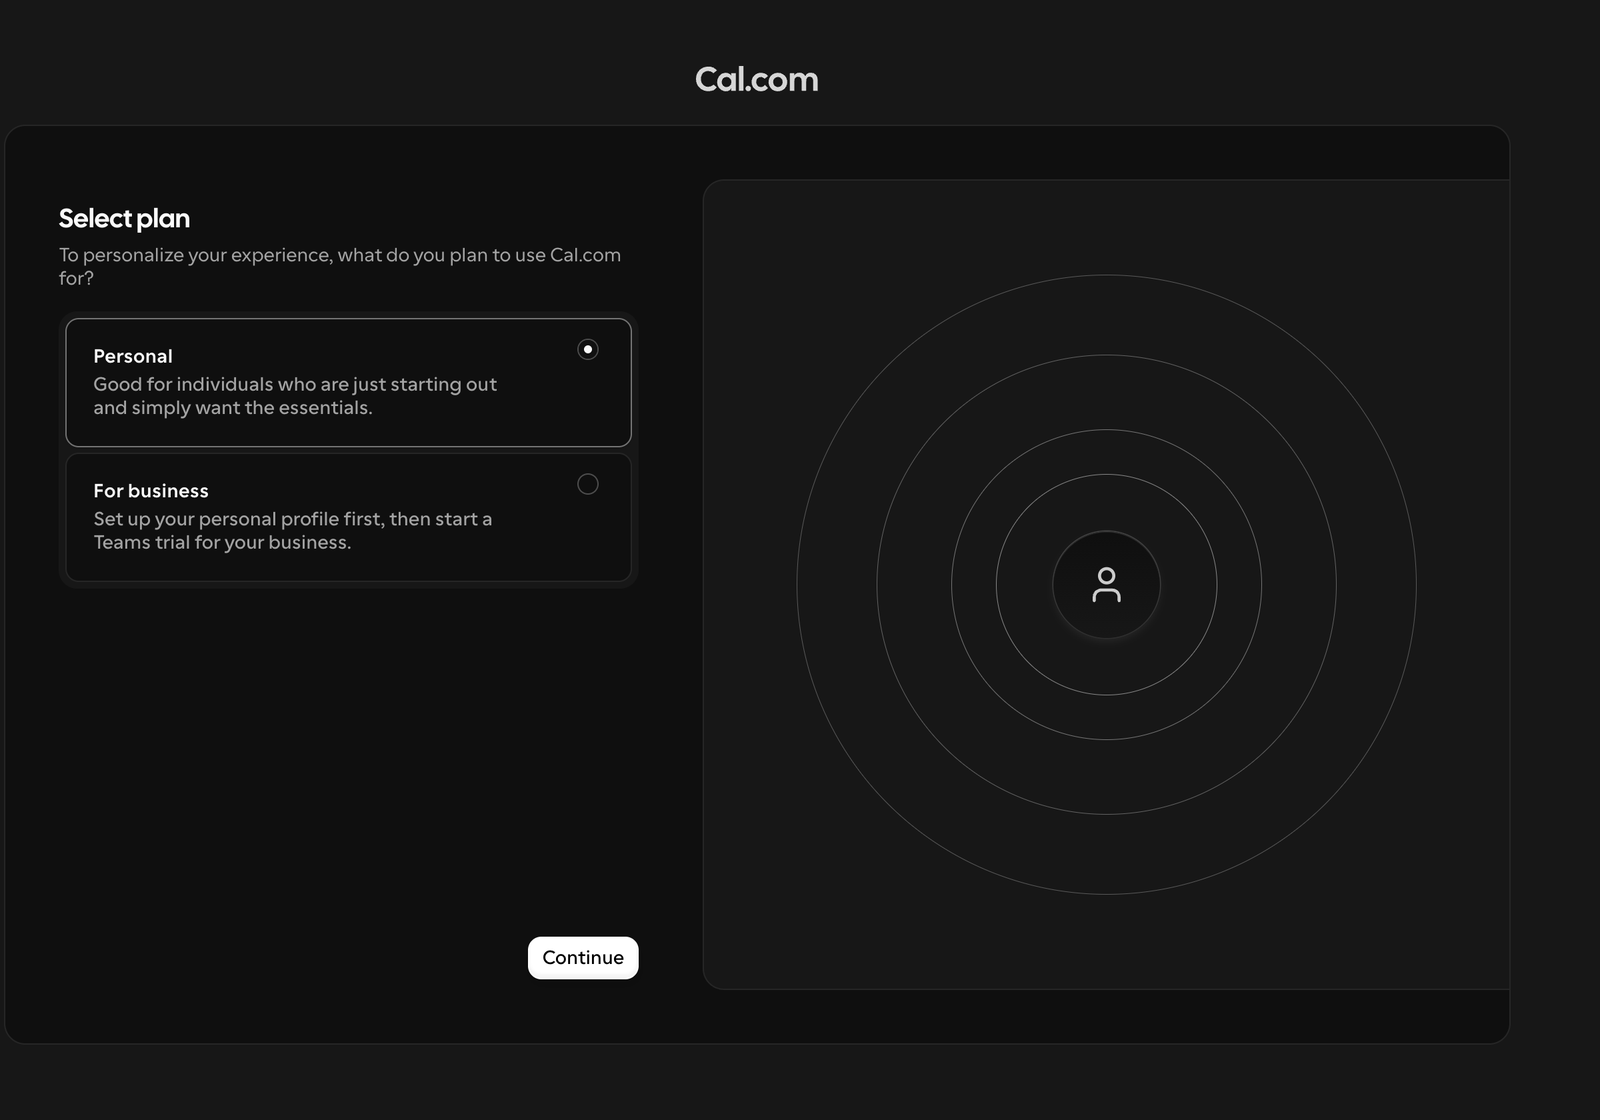
Step 4: Choose "Personal" (the free account)
Cal.com asks how you want to use it. Choose Personal — that's the free account and it's all fonea needs. Click Continue. (You don't need the "For business" team account; it's paid.)
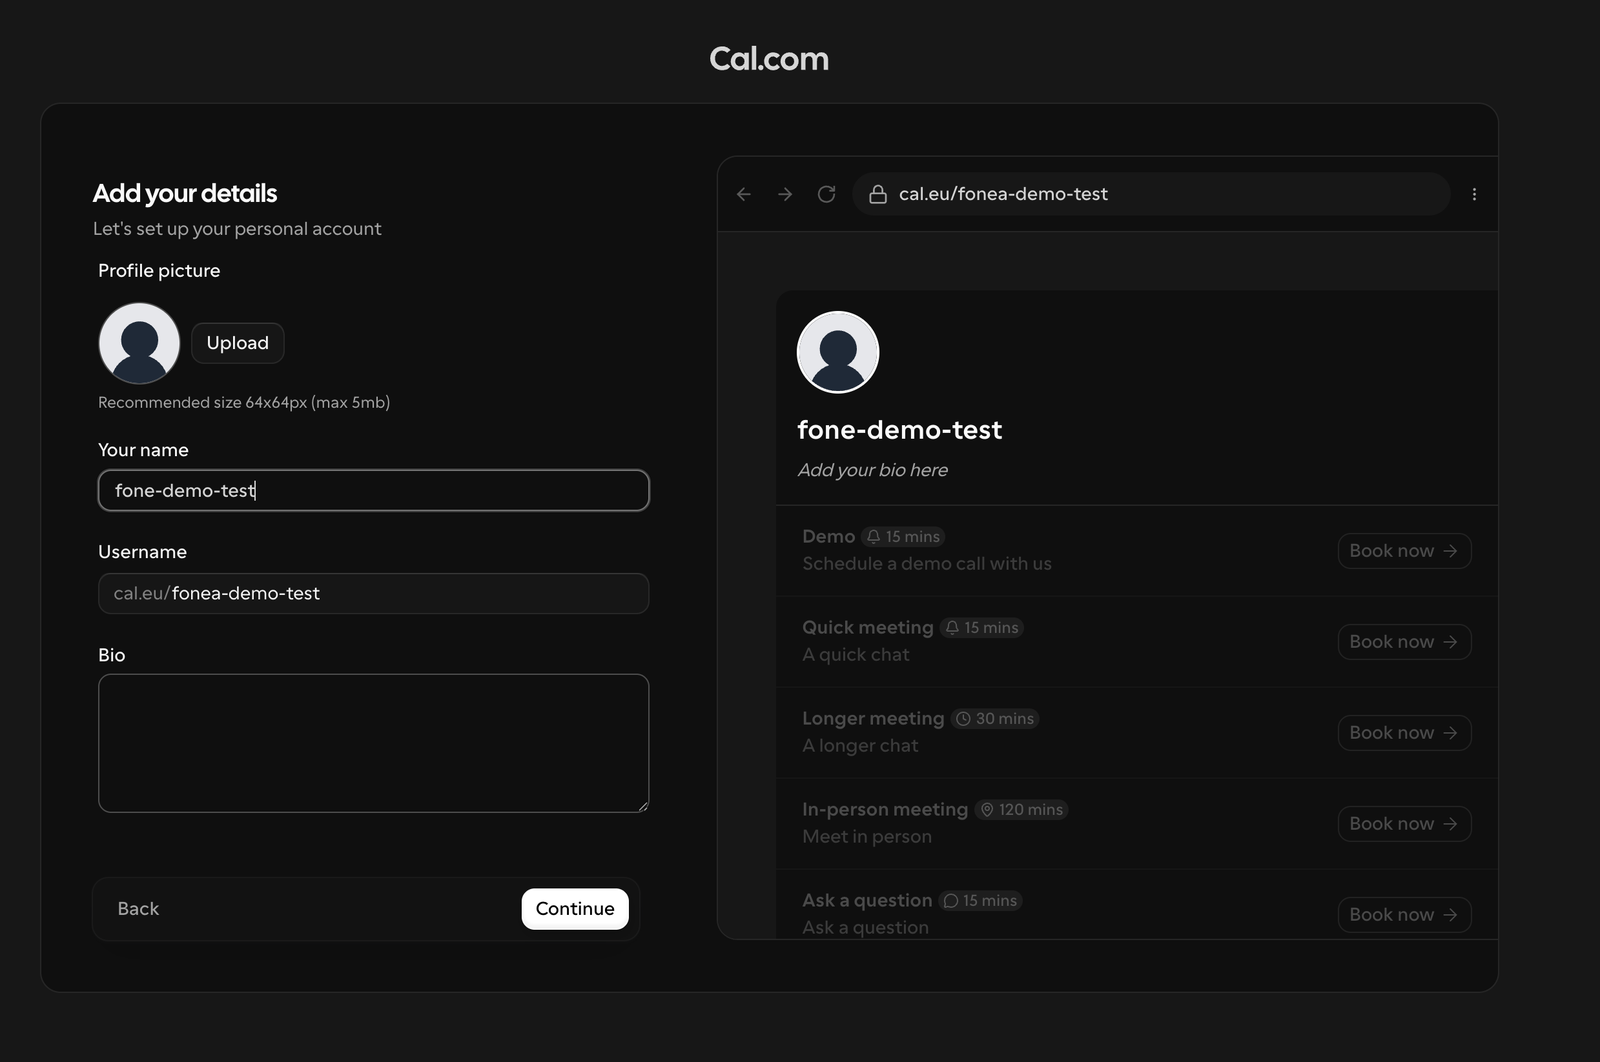
Step 5: Fill in your profile
Enter your name. You can leave the rest as it is and click Continue.
Part B: Connect your calendar
Step 6: Choose your calendar
Now connect the calendar your appointments should be written into. Click Connect next to Google Calendar (or Outlook Calendar).
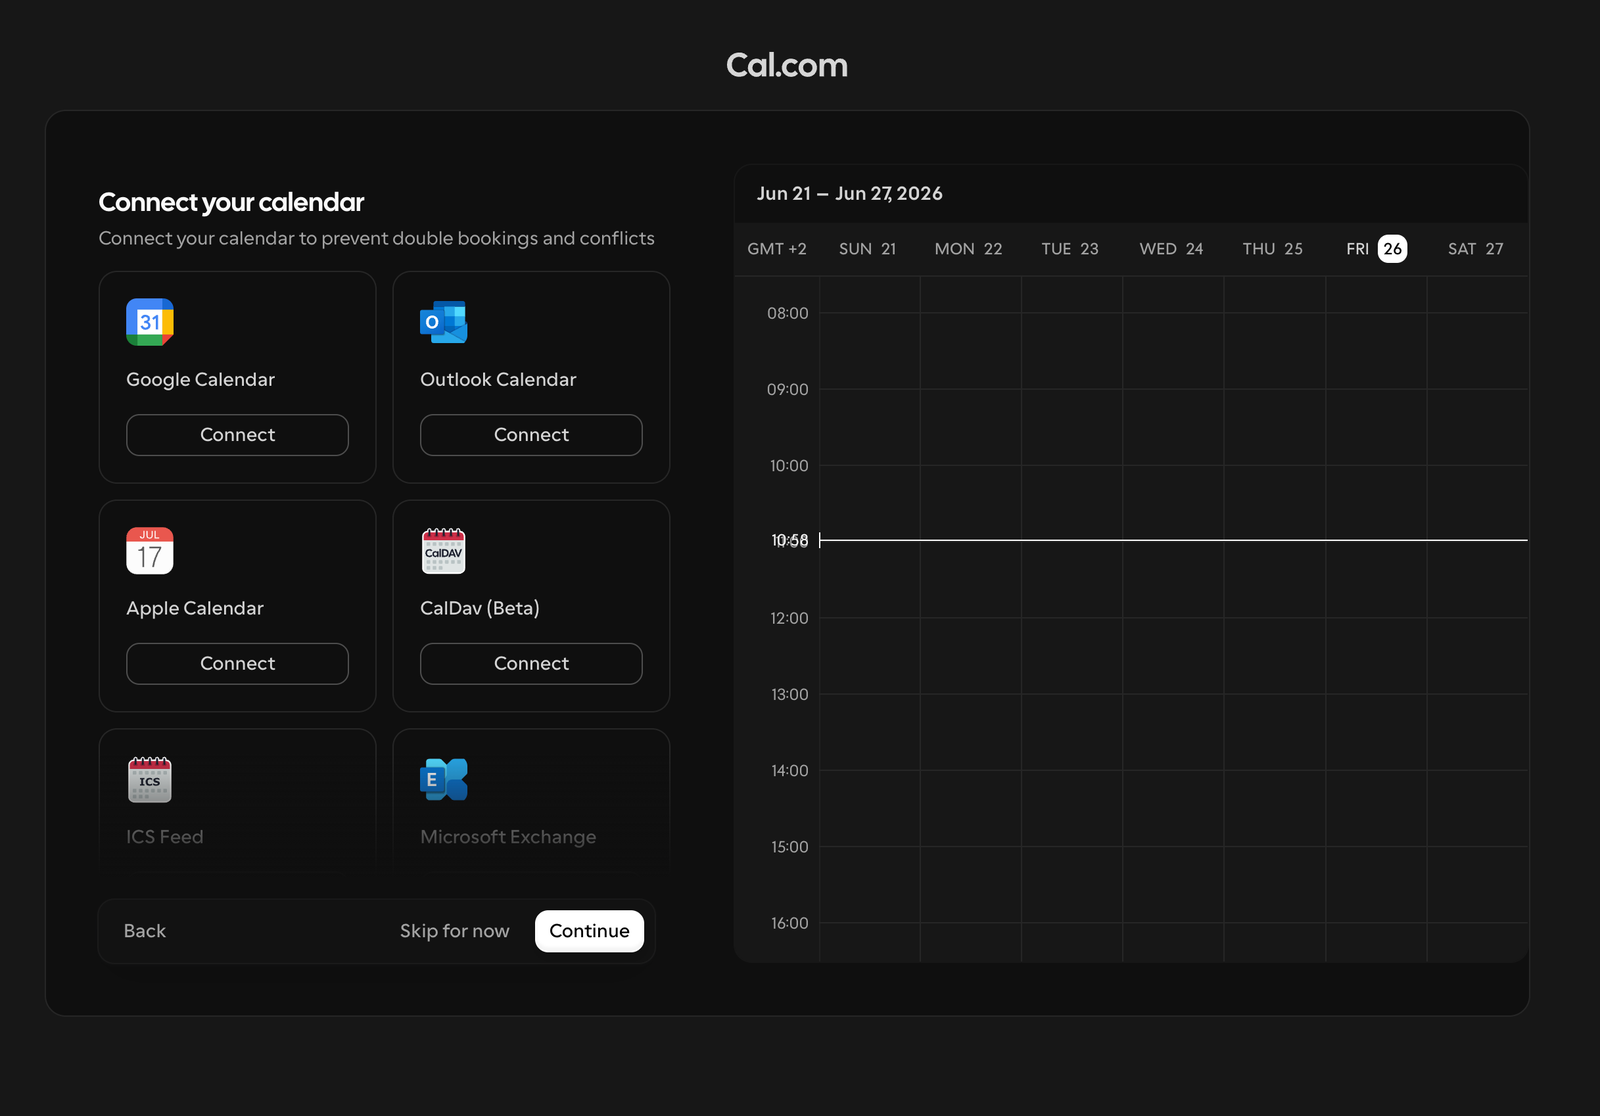
Don't click "Skip for now". Without a connected calendar, fonea can't enter appointments later and can't avoid double bookings. Connect it now.
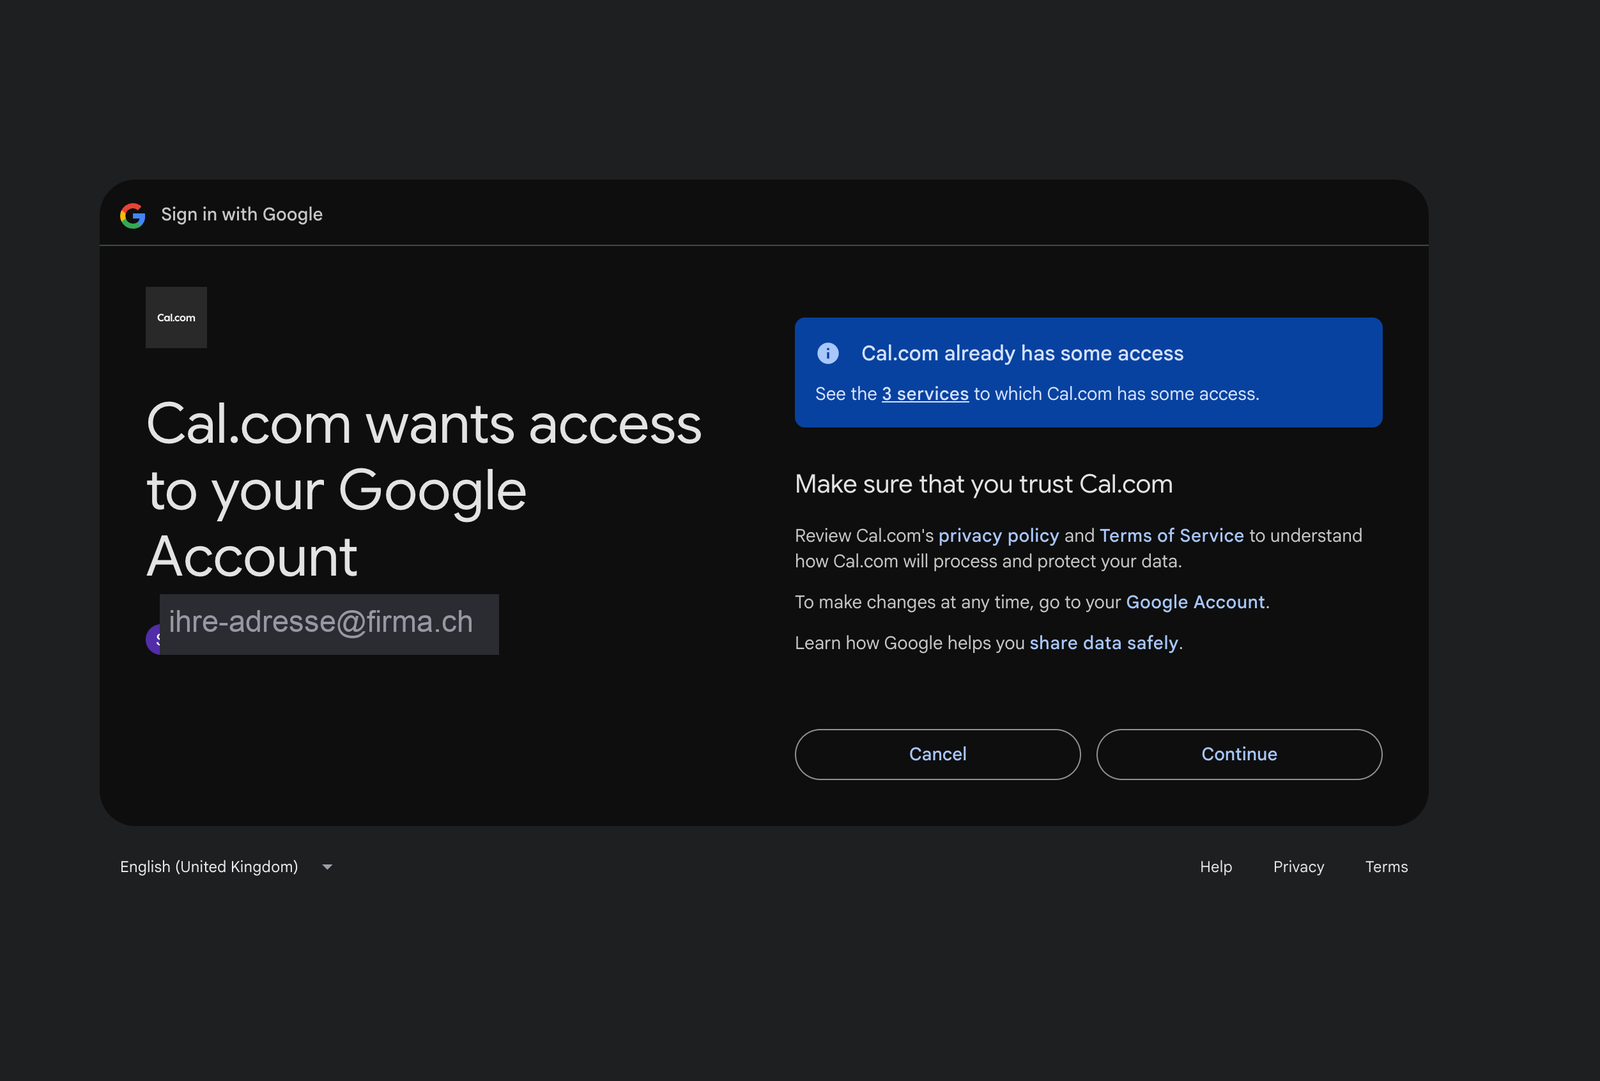
Step 7: Allow access
Google (or Microsoft) asks whether Cal.com may access your calendar. Click Continue or Allow. This is necessary and safe — it's the only way Cal.com can read your busy times and enter new appointments.
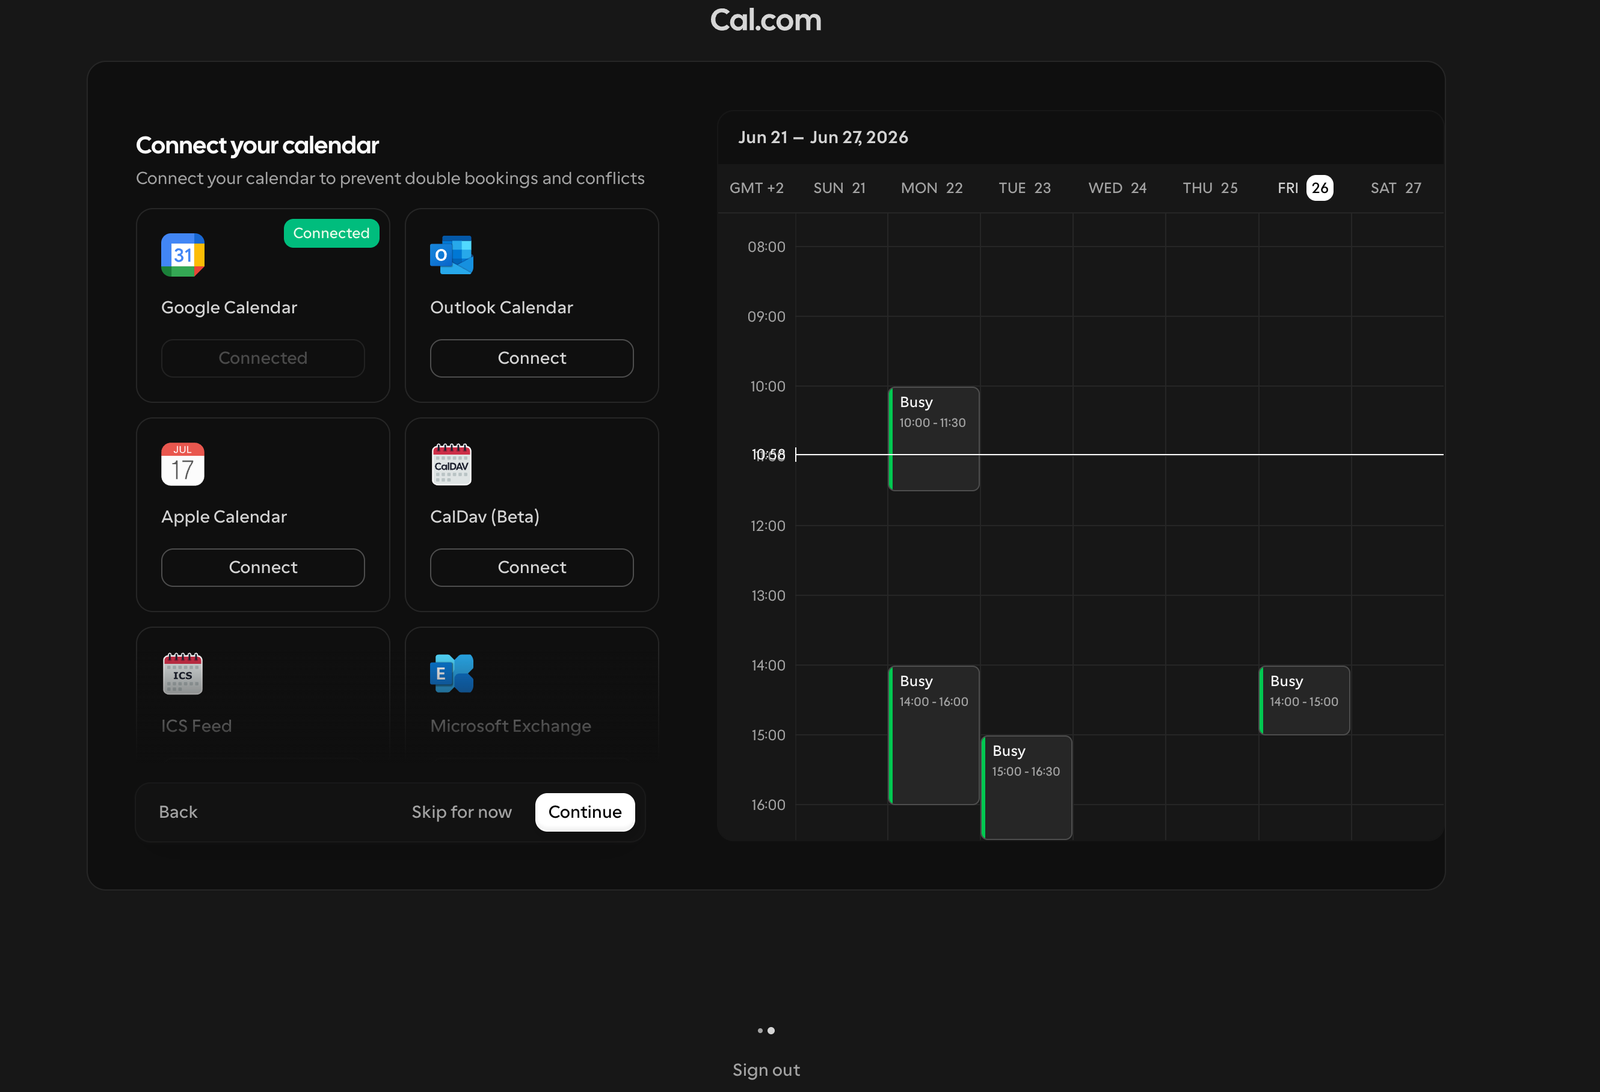
Your calendar is now connected. Cal.com already shows your busy times on the right — exactly the information it uses so nothing ever gets double-booked.
Part C: Set your availability and appointment types
Now you define in Cal.com *when* and *for what* bookings can be made. This happens entirely in Cal.com — fonea simply accesses it later.
Your working hours (availability)
Under Availability you set your general bookable hours, e.g. Mon–Fri, 9am–5pm. Outside these hours — and whenever your calendar is already busy — the assistant won't offer appointments. That way you stay in control without checking every single appointment by hand.
Your appointment types
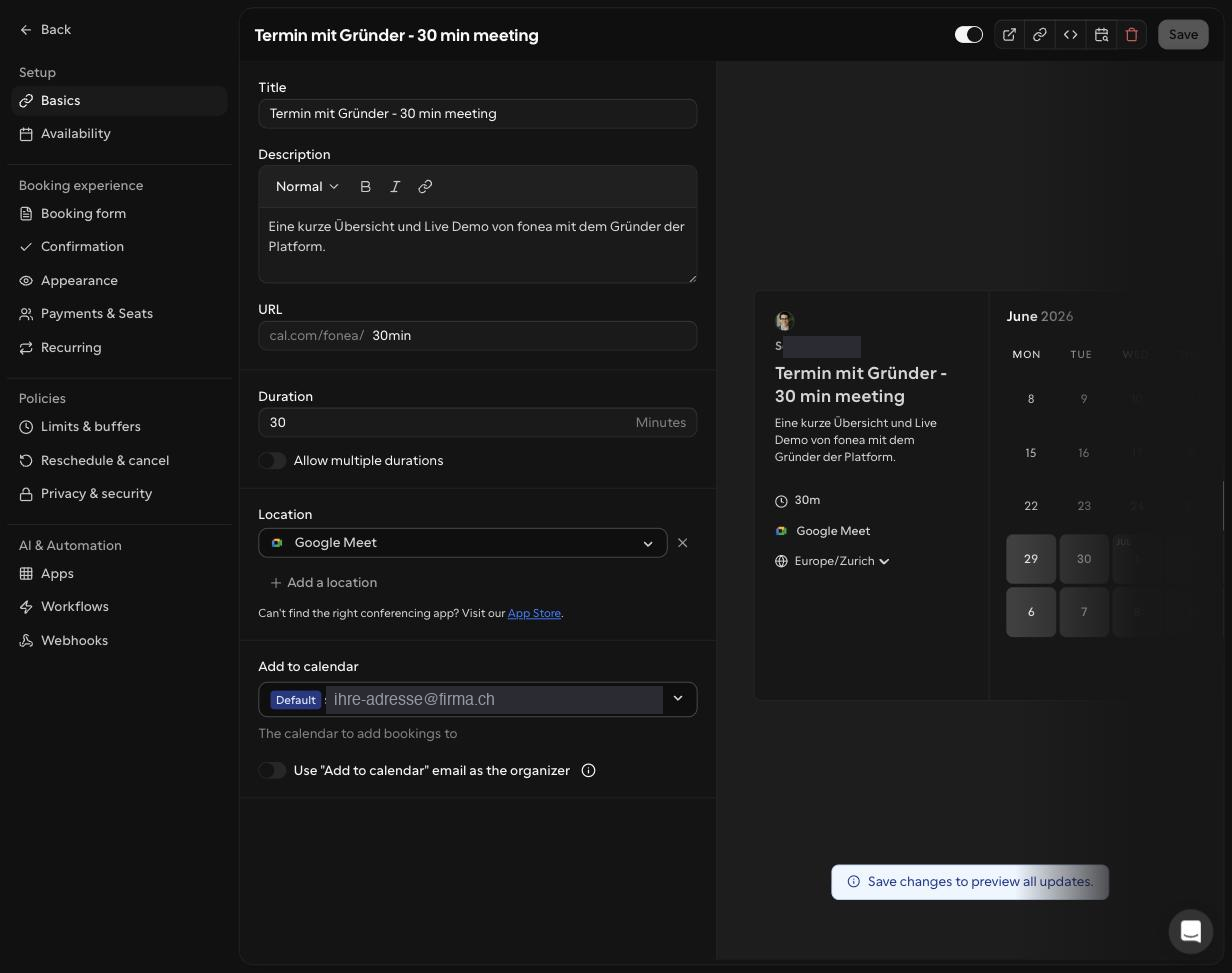
An appointment type is a template for one kind of appointment — and exactly what your assistant offers on the phone. Cal.com automatically creates a few examples ("15 min meeting", "30 min meeting"). Under Event types you can adjust these or create your own with + New, for example:
- 30 minutes and 60 minutes for general appointments
- or very specific ones like "Initial consultation 30 min", "Follow-up check 15 min" or "Consultation 60 min"
That way your assistant offers exactly the appointments that fit your business.
Optional, but recommended. Open an appointment type: in the Basics tab you set the duration and can offer e.g. 30 *and* 60 minutes with "Allow multiple durations". Set the timezone to Europe/Zurich.
In the Limits & buffers tab you can set buffer times ("Before/After event") and a minimum notice period ("Minimum notice", e.g. 2 hours). Don't create any required fields — your assistant captures name and reason in the conversation anyway.

Once your appointment types are in place, the next step is getting the API key.
Part D: Create an API key
The API key is the secret password that allows fonea to book appointments in Cal.com.
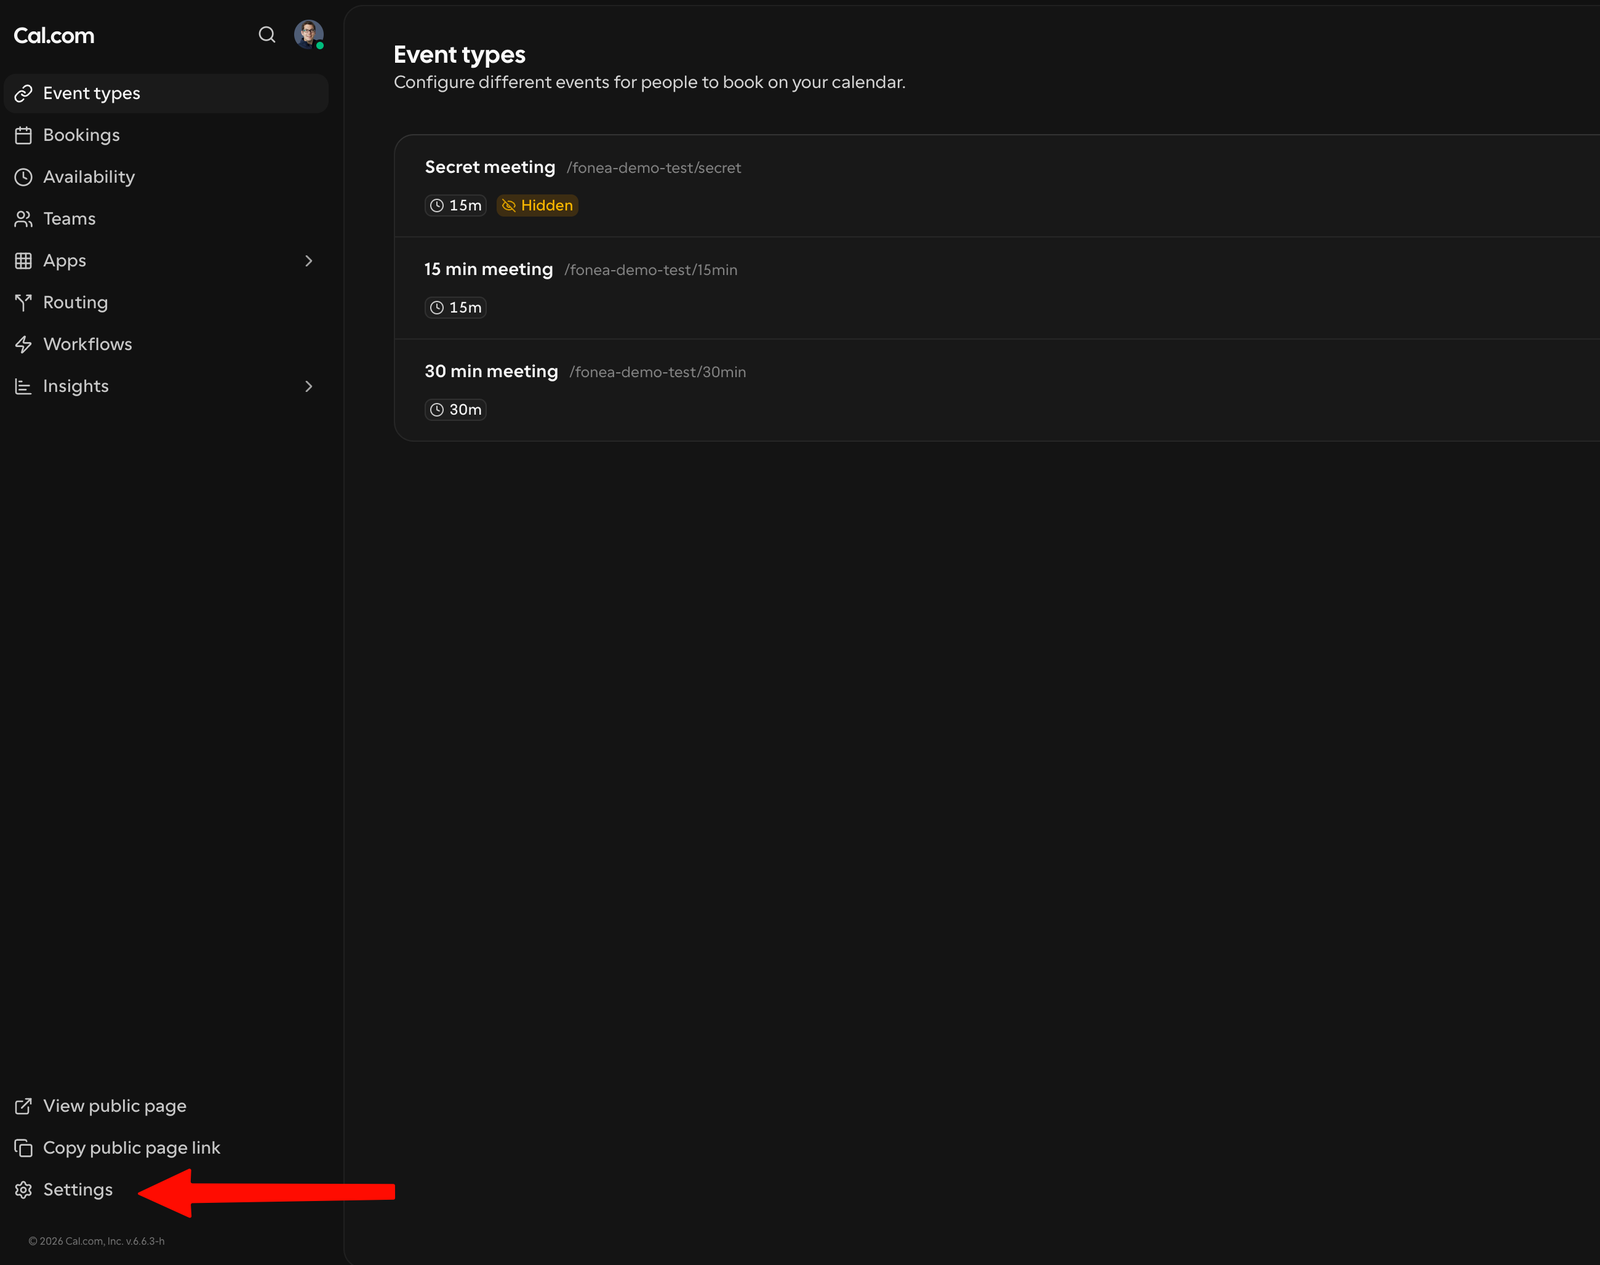
Step 8: Go to the settings
Click Settings at the bottom left.
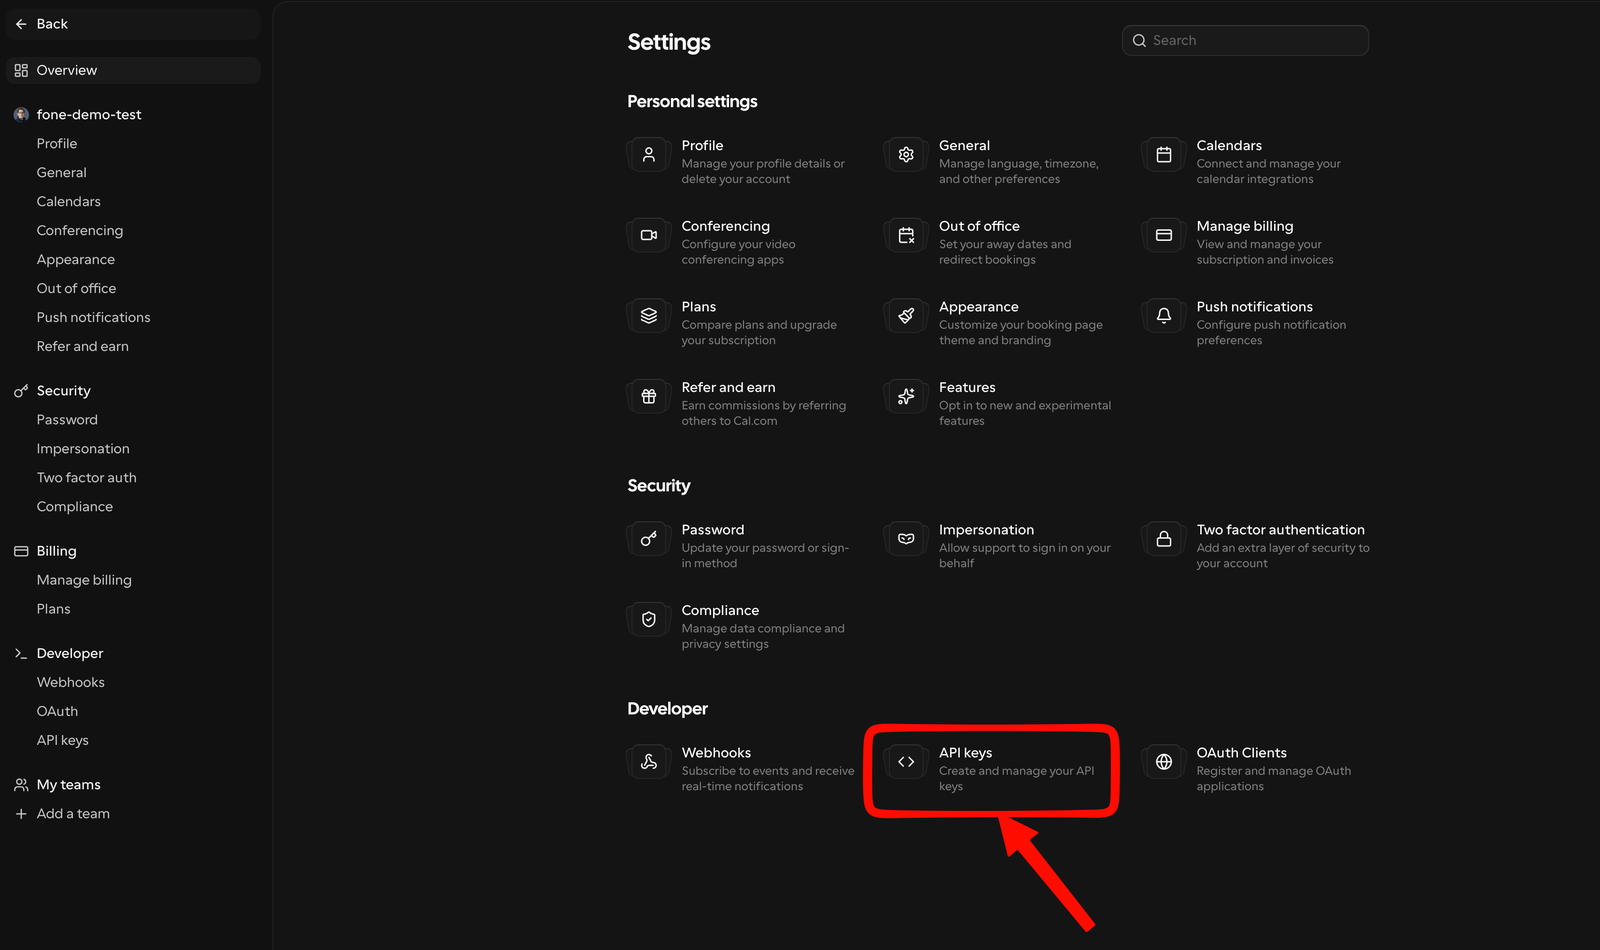
There, under Developer, open API keys.
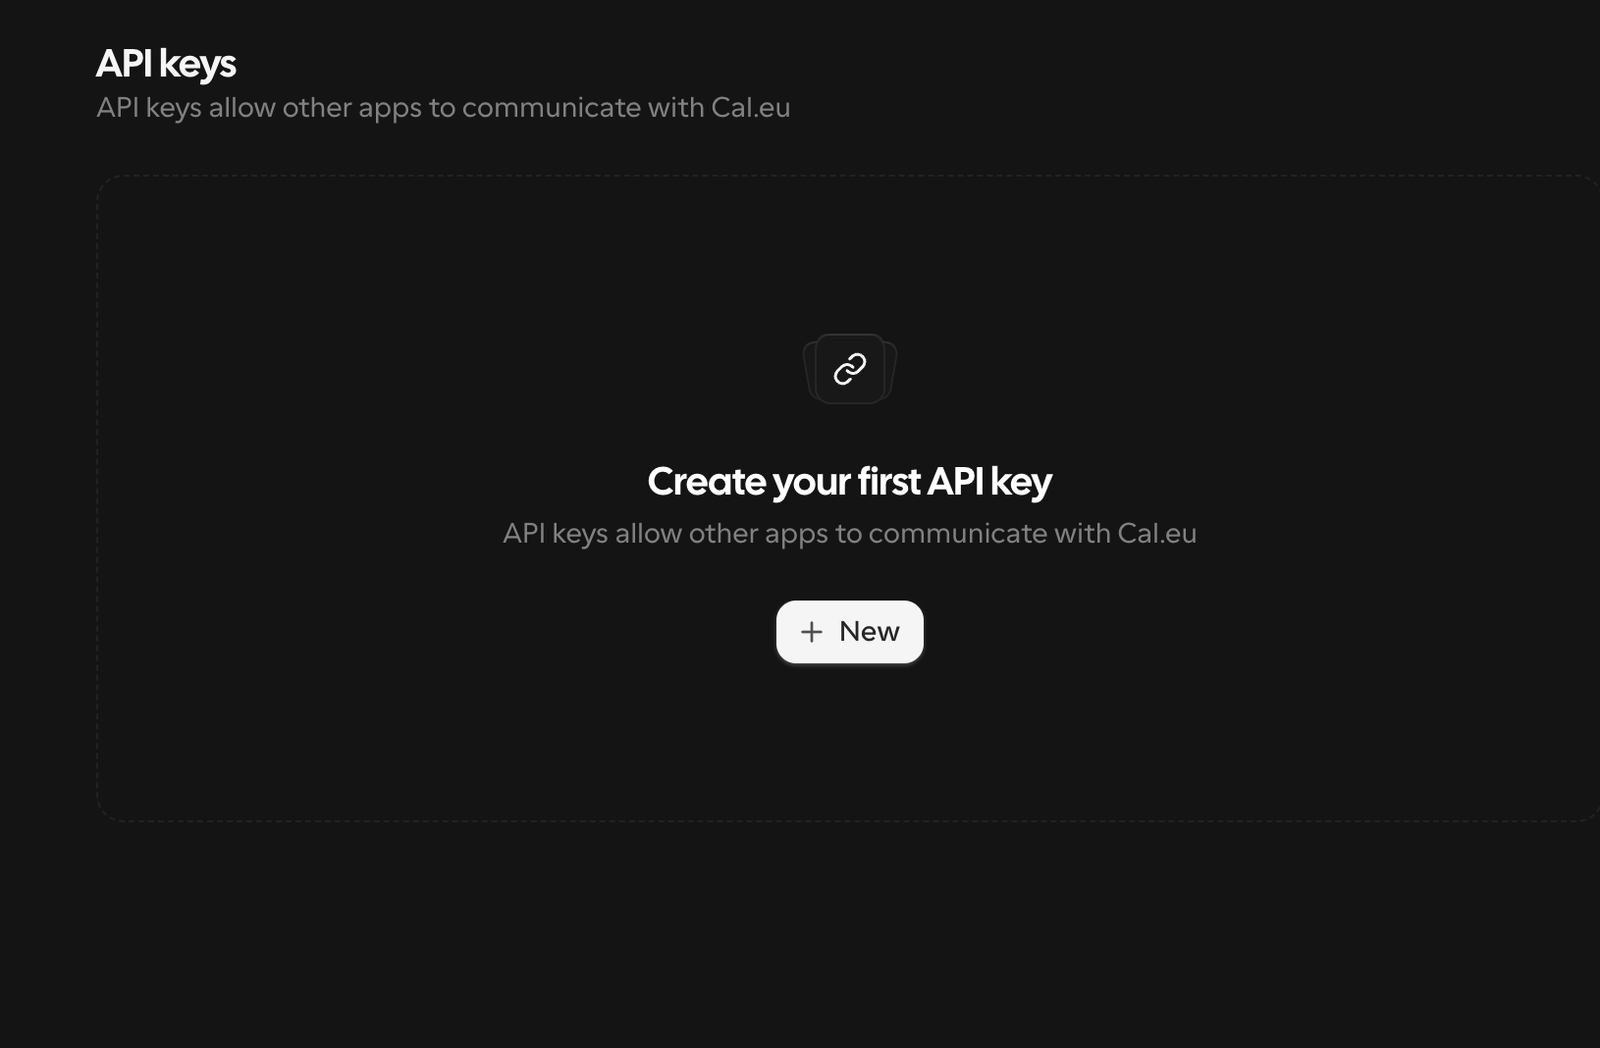
Step 9: Create the key
Click + New, enter a name (e.g. "fonea") and enable Never expires. That way the connection won't suddenly break later. Click Create.
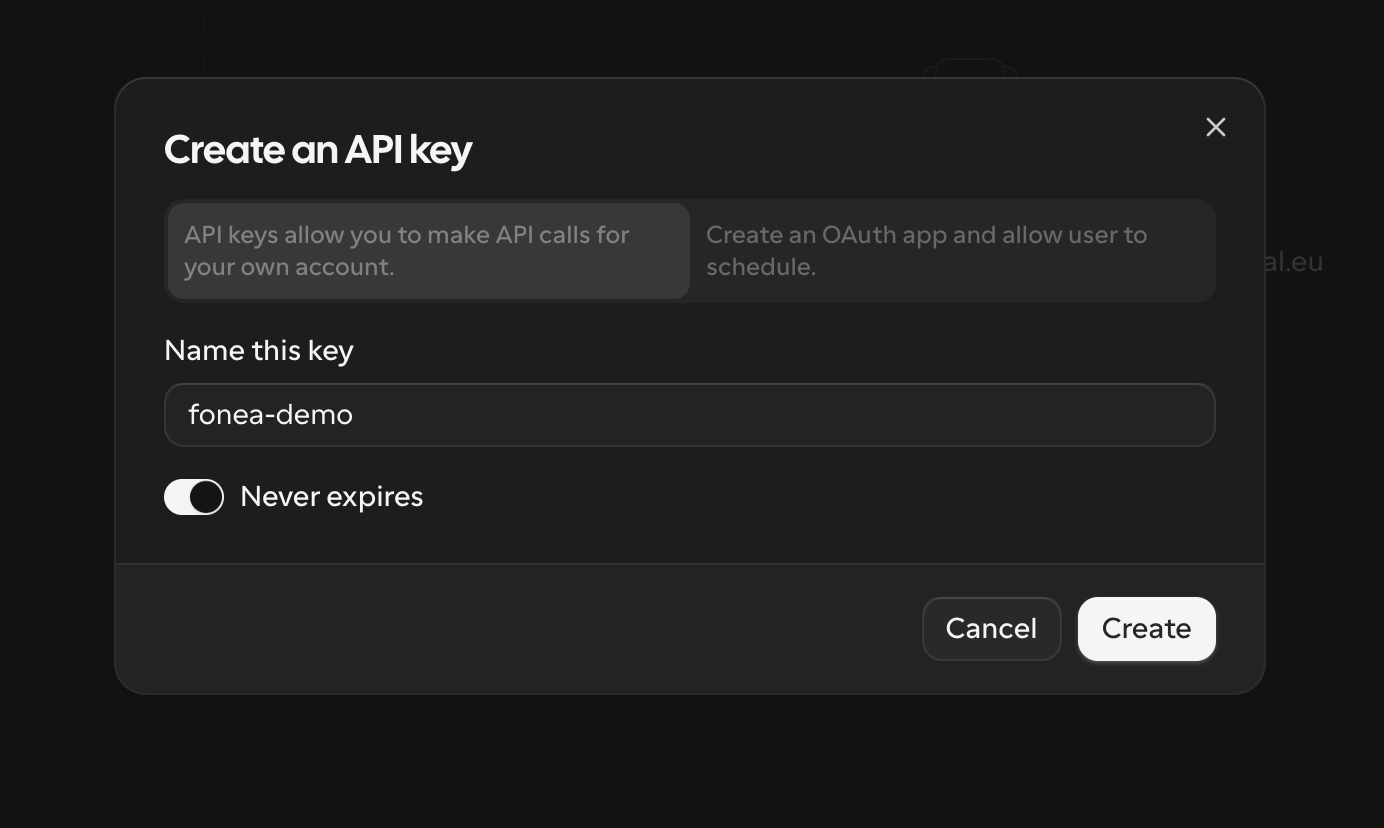
Step 10: Copy the key — and keep it safe
Cal.com now shows you the key — it starts with cal_live_…. Copy it immediately using the icon on the right.
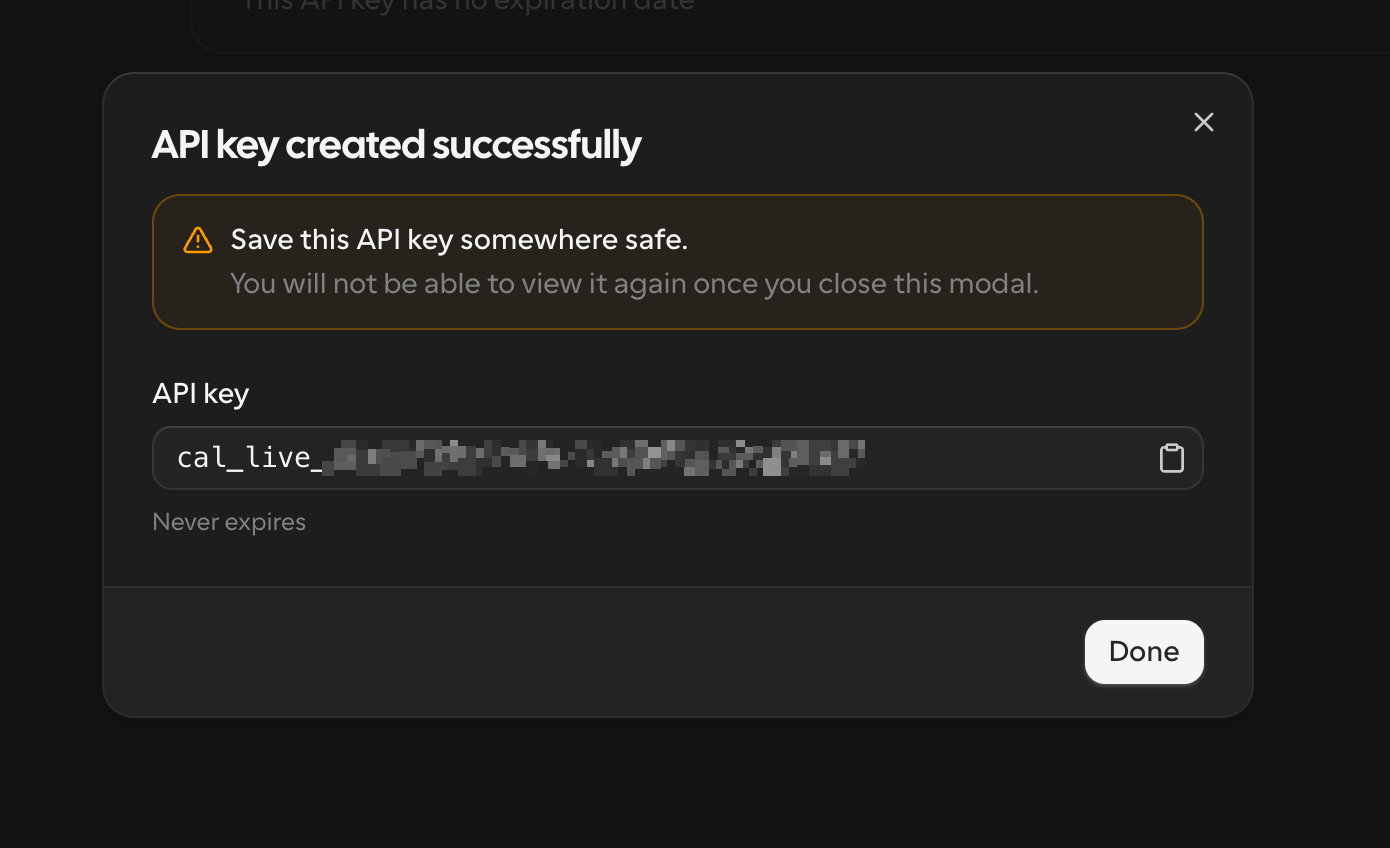
Important — keep it secret. The API key is like a password to your calendar. Never share it, don't send it via chat or email, and enter it only in the fonea dashboard. Cal.com also shows it in full only this one time — copy it now. If you lose it or it accidentally becomes public: simply delete it in Cal.com and create a new one.
Part E: Add it to fonea
Step 11: Enter the key in fonea
Open your fonea dashboard and go to Settings. In the Appointment booking section, paste the copied key into the Cal.com API key field, enter any name you like under Account label (e.g. "Practice calendar") and click Connect.
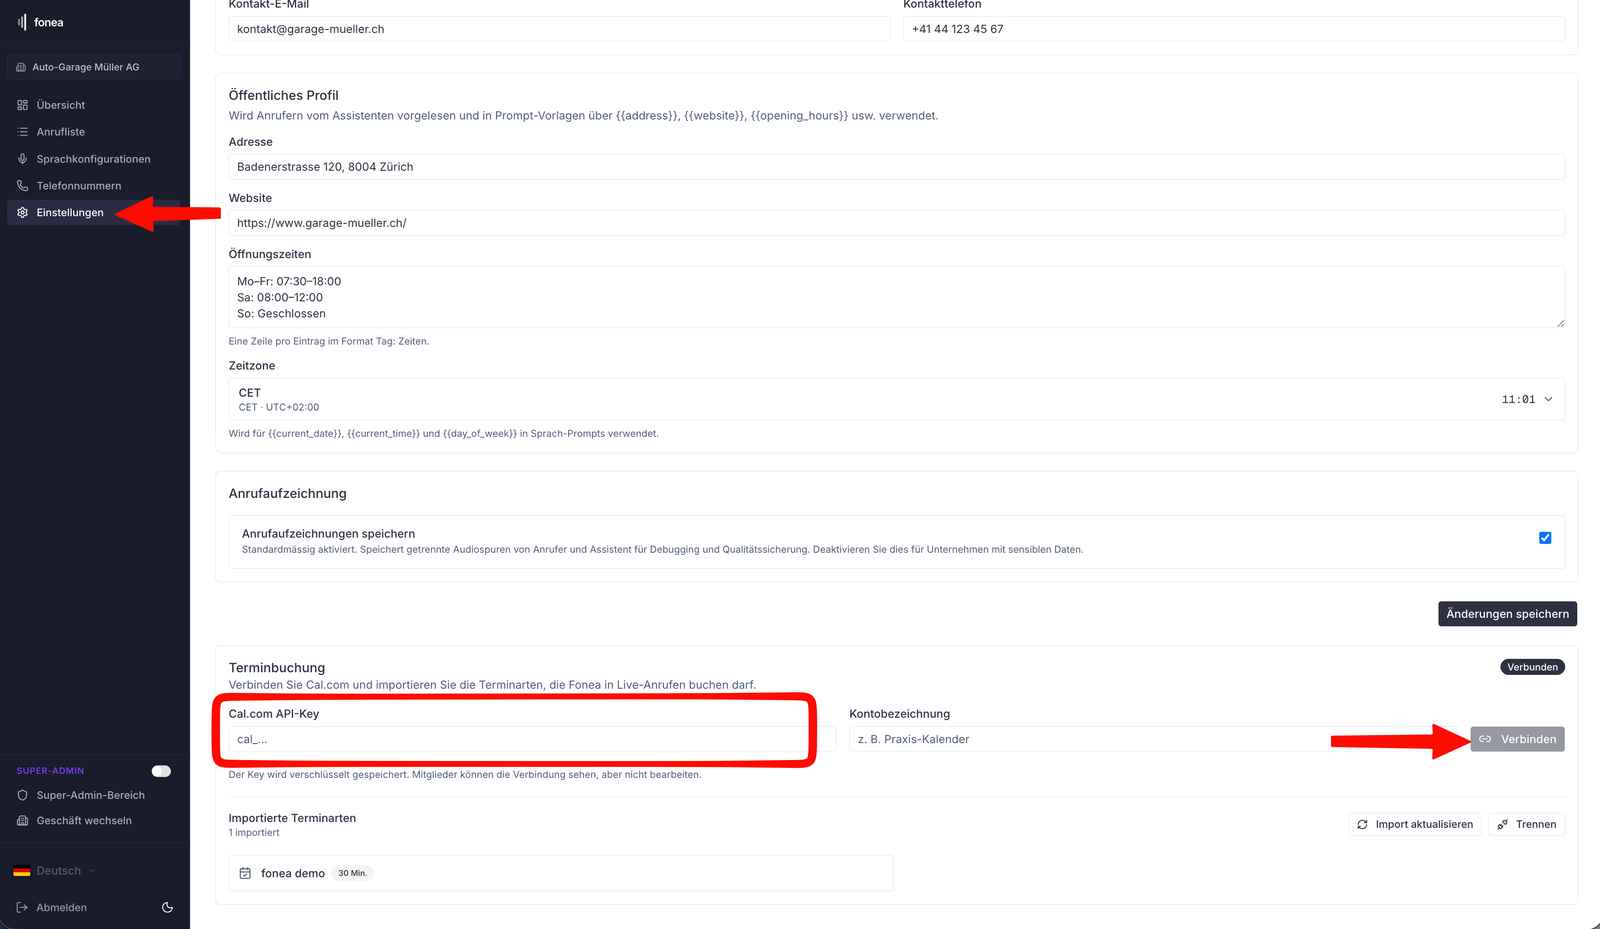
Account label = just a label. It's a name for yourself so you recognise the connection. You can choose whatever you like. Your key is stored encrypted.
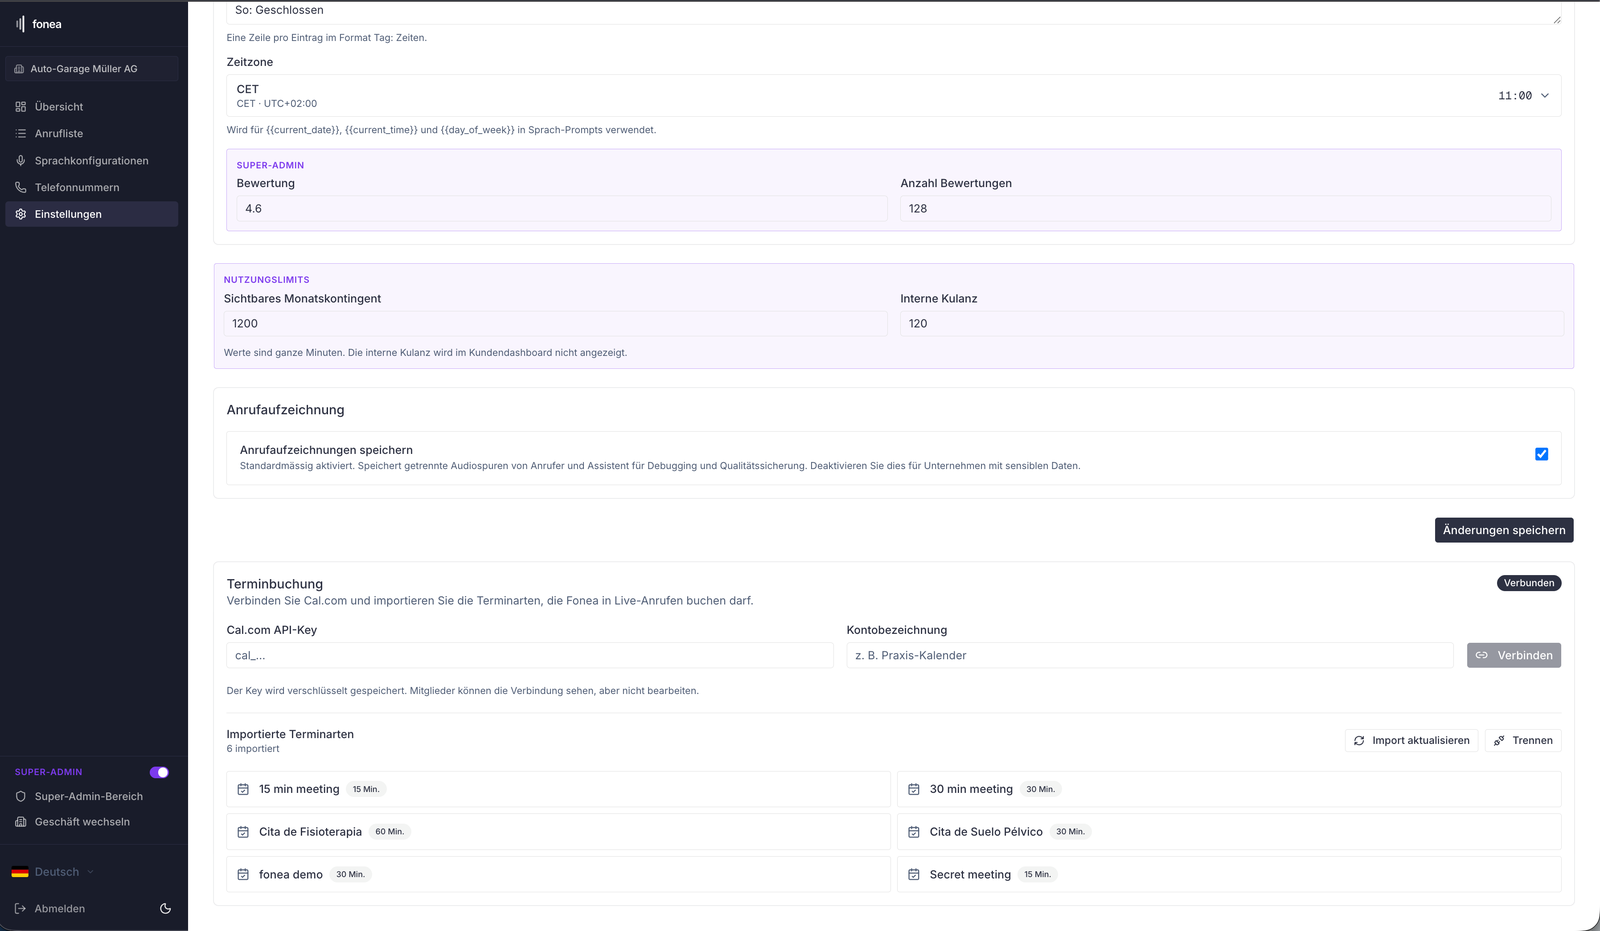
Step 12: Check the imported appointment types
After connecting, fonea shows all appointment types from your Cal.com account under Imported appointment types. Use Refresh import to pull in later changes, and Disconnect to remove the connection.
Step 13: Choose the bookable appointment type per configuration
This is the step that's most easily forgotten: open your voice configuration and, under Bookable appointment types, choose which appointment type this assistant may offer on the phone. Tick the box and click Save selection.
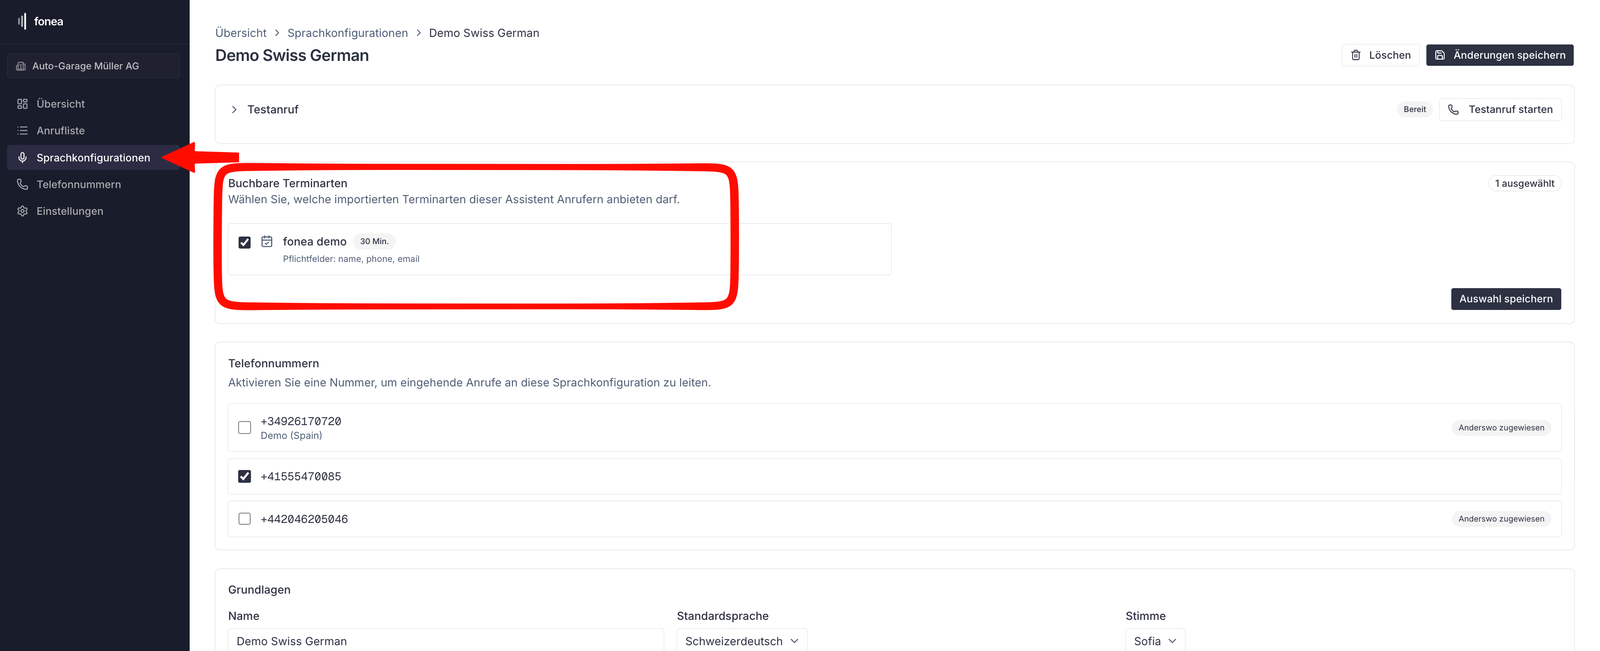
Important: Only when an appointment type is ticked here will your assistant actually offer appointments in the conversation. You can set this differently per configuration.
Step 14: Check with a test call
Finally, make a test call and ask for an appointment. Then check:
- Your assistant offers free time slots (within your working hours and avoiding busy times).
- The booked appointment appears in your Google or Outlook calendar.
If a button has a different name
Cal.com keeps evolving, so a label may occasionally differ slightly or a button may move. The logic stays the same though: look for the equivalent term (e.g. "Settings", "API keys", "Connect"). When in doubt, the search at the top of Cal.com helps.
Frequently asked questions
Why should I choose "Personal" and "European Union"?
Personal is the free account and is all fonea needs. European Union as the data region ensures your data is processed in Europe — the fitting, privacy-friendly choice for Switzerland. Your account then runs under "cal.eu" (the same product as Cal.com).
Where do I define when bookings are allowed?
In Cal.com under Availability — enter your working hours there, e.g. Mon–Fri 9am–5pm. Cal.com combines that with the busy times from your Google/Outlook calendar and only offers genuinely free slots.
What are appointment types and can I change them later?
Appointment types are the appointments your assistant offers (e.g. "30 min", "Initial consultation 30 min"). You can create, change or delete them at any time in Cal.com under Event types and pull them into fonea with Refresh import.
How safe is the API key?
fonea stores it encrypted. Still treat it like a password: never share it, don't send it via chat/email, enter it only in the fonea dashboard. Lost it or accidentally made it public? Delete it in Cal.com and create a new one — done.
My assistant doesn't offer appointments — why?
Usually the last step is missing: in the voice configuration, an appointment type must be ticked and saved under Bookable appointment types (step 13). Also check that your availability is set in Cal.com.
Are double bookings prevented?
Yes. Your Google/Outlook calendar tells Cal.com your busy times, and Cal.com only hands out free slots. The booked appointment then automatically lands back in your calendar.
Can I connect Google and Outlook?
Yes — the process is identical. In step 6, simply choose Outlook / Office 365 instead of Google and sign in with your Microsoft account.
Related articles
Still have questions?
Write to us — we're happy to help. Or listen to a live demo right in your browser.